.svg?sfvrsn=be606e78_3)
Until they get cited in an inspection, most sterile processing departments are forced to cut corners and take shortcuts. My job is to arrive on the scene in advance of the surveyor’s unannounced visit to discover areas of needed improvement so your SPD passes inspection with flying colors. Because I can’t get out to see all of you, I’ll share the areas surveyors are sure to review. Don’t say you weren’t warned.
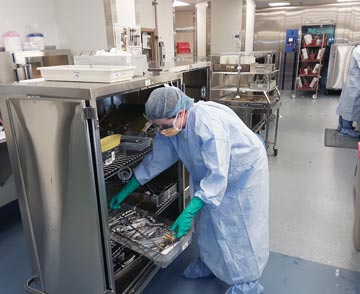
1. Follow instruments from dirty to clean. The 4 main components of a sterile processing department are decontamination, inspection/assembly, sterilization and storage. But the inspection neither starts nor ends in those areas. Using what’s called the Tracer Method, surveyors will follow instruments from dirty to clean. They’ll observe them from the OR post-use until they’re returned to the OR for the next procedure. Here’s what the surveyors will expect to see from your OR and reprocessing staffs:
- Point-of-use cleaning. Surveyors want to know that you’re cleaning instruments as much as possible during procedures. They’re checking that gross debris is removed and lumens are adequately flushed so the decontamination process that follows is more efficient and effective.
- Transport. Instruments should be transported in a closed container to prevent spills. They should also be pre-treated with an approved enzymatic foam and kept moist. They must be labeled with a biohazard label. There shouldn’t be any holes in packs and wraps, and no missing or damaged container filters.
2. Decontamination documentation. Surveyors will ask to see instrument manufacturers’ instructions for use (IFU). They’ll want to know that you’re following those detailed guidelines on disinfection, cleaning and inspection, and ask you to describe and demonstrate how you’re reprocessing in accordance with those written instructions.
You should have a 3-basin sink — one for soaking, one for washing and one for rinsing. Remember that the third basin should incorporate either deionized or reverse osmosis treated water. Adding a treatment to the rinse helps to ensure that you are compliant. It will also help your instruments have a longer life.
Surveyors also want to see an ultrasonic cleaning machine for use after the devices are washed in the sink and before they go to the washer-disinfector. Hint: Make sure you follow device manufacturers’ IFUs in the ultrasonic cleaner.
Be sure to monitor the temperature of the water in the sink. Device manufacturers’ IFUs will provide a temperature range. Also monitor how much enzymatic solution you put in the water. The manufacturer of the ultrasonic cleaner will provide a pump that will dilute the water, so you don’t have to worry about manually pumping the solution into a gallon of water. Be sure to test the pump daily to ensure that it’s working properly.
Surveyors will check for adequate lighting near the sink and observe your reprocessing techs don and doff personal protective equipment to ensure they do it properly. Do you test your ultrasonic and washer-disinfectors daily? The inspectors will review your daily logs, so make sure you document the testing. Finally, do you know how to change the cleaning times on the ultrasonic cleaner? Typically, they are pre-set to 5 or 6 minutes, but device manufacturers might want items cleaned for 15 minutes or longer.
3. Instrument inspection and assembly. Make sure cutting devices are cutting, and clamps are clamping. Sounds simple, but not all surgical facilities do that, which is bad during an inspection or otherwise. The goal is to make sure all of the instruments are working properly. Some other things to consider when inspecting instruments:
- Proper lighted magnification. If you don’t have a magnifying glass with a light, get one. And if you have one, or when you get one, use it! I’ll often go to departments where they have one, but don’t use it.
- The right inspection tools. Instruments often don’t get inspected the way they should because of time constraints and a lack of adequate instrument inventories. Ensure that your department has the proper tools to test your instruments, particularly cutting devices. Ask your instrument manufacturers what you should be using to test their devices. They will be more than happy to help you. Also, ask them to provide education for proper inspection and testing.
Once you’ve inspected instruments, follow their IFUs — whether you put them in a peel pack, blue wrap or a container. Keep the following in mind while reassembling instrument sets:
- Peel packs. Don’t double-pack unless the manufacturer says you can. Place instruments in an open position, not a ratcheted one, into the pack. Is the proper chemical indicator in the pack and is the pack properly sealed? Visually inspect and test the pack’s heat sealer.
- Blue wrap. Fold it as the instructions say, and tape and label it appropriately.
- Containers. Are the correct filters in place? Are the gaskets intact and not damaged? Are containers’ surfaces smooth and without damage? Is the outside free of tape and debris? Do the containers close easily and properly?
4. The sterilizer. Test the sterilizer daily for 3 things: time, temperature and pressure. Keep good documentation for every load and every cycle. Are you placing the appropriate biological indicator into the sterilizer, and putting it in its proper place according to the manufacturer’s IFU? Surveyors will review your sterilization logs. They’ll ask about physical, chemical and biological indicators.
.svg?sfvrsn=56b2f850_5)